Seal Your Garage Floor: The Ultimate Step-by-Step Guide for Long-Lasting Protection
by Mark
Introduction
If you're a proud homeowner with a garage, you're likely aware of the value this space adds to your property. Not only does it provide a secure shelter for your vehicles, but it also serves as a versatile storage area for all your tools, equipment, and outdoor gear. However, one aspect that often goes unnoticed and neglected is the garage floor.
Understanding the Need for Garage Floor Sealing
The Risks of an Unsealed Garage Floor
Have you ever noticed water seeping into your garage during heavy rain or snow? If so, your garage floor might be unsealed, leaving it vulnerable to water damage and other potential issues. Unsealed garage floors are susceptible to numerous problems such as cracks, stains, and even structural damage over time. Water, oil, and other liquids can penetrate the porous concrete surface, causing it to weaken and deteriorate. Not to mention, accumulated moisture can lead to mold and mildew growth, posing health risks to you and your family.
The Benefits of Sealing the Garage Floor
On the flip side, sealing your garage floor can bring a myriad of benefits that go beyond simple aesthetics. Garage floor sealing provides an effective protective barrier that shields the concrete from moisture, chemicals, and stains. This prevents cracks from forming and reduces the likelihood of expensive repairs down the road. Furthermore, a sealed garage floor is much easier to clean and maintain, allowing you to keep the space tidy and presentable effortlessly.
Why Now Is the Best Time to Take Action
You might be wondering, "Is it really necessary to seal my garage floor now?" The answer is a resounding yes! Taking action now can save you from potential headaches and expenses in the future. As with most home improvement projects, addressing the issue early on is always the best course of action. The longer you wait, the more susceptible your garage floor becomes to damage, and the more extensive the repairs will be. By sealing your garage floor promptly, you ensure long-lasting protection and peace of mind.
Common Garage Floor Issues
Identifying Cracks and Surface Damages
Before diving into the sealing process, it's essential to assess the condition of your garage floor. Walk around and inspect the surface for any signs of cracks, gaps, or surface damages. Small cracks might seem harmless, but they can worsen over time and lead to more significant issues. Identifying these problems early on allows you to address them during the sealing process, ensuring a smoother and more effective outcome.
Potential Consequences of Untreated Floor Problems
Neglecting to seal your garage floor can have severe consequences. Aside from water damage and structural issues, untreated floor problems can create a hazardous environment. Cracks and uneven surfaces pose a tripping hazard, which could lead to accidents and injuries. Moreover, leaks and moisture can damage your belongings stored in the garage, including tools, equipment, and sentimental items.
How Sealing Can Prevent Further Damage
 Garage floor sealing acts as a protective shield, preventing liquids from seeping into the concrete and causing damage. When you seal the floor, you create a barrier that repels water, oil, chemicals, and other substances. This not only extends the lifespan of your garage floor but also helps maintain its pristine condition. By taking this proactive step, you safeguard your investment and ensure the longevity of your garage floor.
To continue reading about the necessary tools and materials for sealing your garage floor, head on to Section 2: Preparing Your Garage Floor for Sealing.
Stay tuned for more valuable insights on how to transform your garage into a leak-proof sanctuary!
FAQs
Q: Can I seal my garage floor myself, or should I hire a professional? A: Garage floor sealing is a manageable DIY project, especially with the right guidance. However, if you're unsure or lack the time, hiring a professional can ensure a flawless and efficient job.
Q: How often should I reseal my garage floor? A: The frequency of resealing depends on the type of sealant used and the level of wear and tear. In general, it's recommended to reseal your garage floor every 2-5 years for optimal protection.
Q: Are there eco-friendly sealant options available? A: Yes, many manufacturers offer environmentally friendly sealants that are low in volatile organic compounds (VOCs) and have minimal impact on the environment.
Preparing Your Garage Floor for Sealing
Introduction
Congratulations on taking the first step towards protecting your garage floor! Now that you understand the importance of sealing and have identified potential issues, it's time to prepare your garage floor for the sealing process. Proper preparation is key to achieving a long-lasting and effective seal, so let's delve into the essential tools, materials, and steps required.
PremierGarage® of South Florida is your premium total garage optimization partner committed to providing innovative, high-quality solutions. Come visit us here:
Necessary Tools and Materials
A Checklist of Essential Items for the Job
Before you start the garage floor sealing process, it's crucial to gather all the necessary tools and materials. Here's a comprehensive checklist to ensure you're well-prepared:
- Concrete cleaner: Choose a high-quality concrete cleaner to remove any dirt, oil stains, or residues on the floor surface.
- Stiff-bristled brush or broom: Use this to scrub the floor and ensure thorough cleaning.
- Pressure washer: A pressure washer is highly effective in removing stubborn stains and grime from the concrete.
- Concrete patching compound: This will come in handy to repair cracks and small surface damages before sealing.
- Safety gear: Don't forget to wear protective equipment, including gloves and safety goggles, to ensure your well-being during the process.
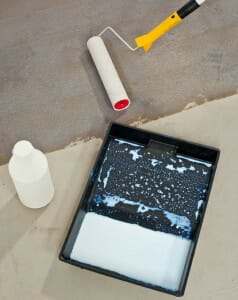
- Applicator: Depending on your chosen sealant type, you'll need either a roller, brush, or sprayer for application.
- Respirator mask: To protect yourself from fumes during sealing, a respirator mask is a must.
- Sealant: Pick a high-quality sealant that matches your garage floor's needs, whether it's penetrating, topical, or epoxy-based.
Where to Find Quality Sealing Products
When it comes to garage floor sealing, quality matters. Opting for cheap or subpar products may result in disappointing outcomes and shorter protection. Visit your local hardware store or home improvement center to find reputable brands and consult with the staff for expert advice. Additionally, you can explore online marketplaces and read reviews from other customers to ensure you're investing in the best sealant for your floor.
Pro Tips on Choosing the Right Sealant Type
Selecting the appropriate sealant type is vital for a successful sealing project. Consider the following factors when making your decision:
- Concrete type: Determine whether your garage floor is bare concrete or has been previously sealed. Different types of concrete may require specific sealants.
- Desired finish: Decide on the level of gloss or finish you prefer. Some sealants offer a glossy finish, while others provide a matte look.
- Protection level: Consider the level of protection required for your garage floor. If your area experiences heavy foot traffic or frequent exposure to chemicals, opt for a more durable sealant.
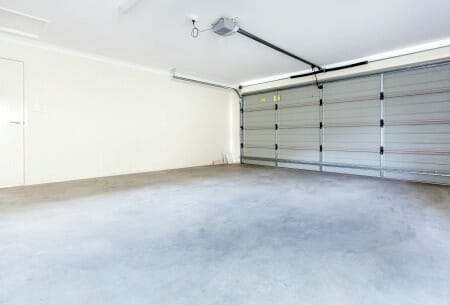
Cleaning and Clearing the Area
Step-by-Step Guide to Cleaning the Floor Surface
A clean and debris-free surface is crucial for achieving an optimal seal. Follow these steps to thoroughly clean your garage floor:
- Remove all items: Clear the garage of vehicles, tools, and other belongings to create a clean workspace.
- Sweep or vacuum: Start by sweeping or vacuuming the entire floor to remove loose dirt and debris.
- Treat oil stains: Apply a degreaser or use kitty litter to absorb any oil or grease stains on the floor. Let it sit for a few hours before cleaning it up.
- Pressure wash: Use a pressure washer to deep clean the concrete surface and remove stubborn stains. Pay close attention to corners and edges.
Removing Oil Stains, Dirt, and Debris
Oil stains can be particularly stubborn and require special attention. Follow these tips to effectively remove them:
- Absorb the oil: If fresh, use a rag or paper towels to absorb excess oil. For older stains, cover them with kitty litter and let it sit for at least a few hours before cleaning.
- Scrub the stains: Use a stiff-bristled brush and a concrete cleaner to scrub away the remaining oil stains. Repeat if necessary until the stains are gone.
- Rinse with water: Rinse the area thoroughly with water to ensure all cleaning agents and residues are removed.
Organizing the Garage for a Seamless Sealing Process
As you prepare your garage floor for sealing, take this opportunity to organize and declutter the space. Consider these tips for an efficient sealing process:
- Group items: Categorize your belongings into sections and group similar items together. This will make it easier to move them around during the sealing process.
- Create space: Clear out enough space to allow for smooth movement during sealing. Ensure you have easy access to all areas of the garage floor without any obstructions.
- Protect items: Cover any items that you can't move, such as built-in shelves or heavy equipment, with plastic sheets to protect them from accidental splatters or spills during sealing.
Now that your garage floor is clean and organized, you're ready to move on to the next crucial steps in the sealing process.
Step-by-Step Sealing Process
In Section 3: Step-by-Step Sealing Process, we will guide you through the precise steps to fill cracks, apply the sealant, and ensure a seamless sealing process. Stay tuned to make your garage floor invulnerable to damage!
FAQs
Q: Can I use a regular household cleaner to clean my garage floor? A: While a regular household cleaner may work for light dirt, it's best to use a concrete-specific cleaner that can effectively tackle tough stains and residues.
Q: What type of sealant is best for a garage floor with heavy foot traffic? A: For high-traffic areas, consider an epoxy-based sealant, which provides exceptional durability and resistance to wear and tear.
Q: Is it necessary to wear a respirator mask during sealing? A: Yes, a respirator mask is crucial to protect yourself from inhaling fumes and harmful particles released during the sealing process.
Step-by-Step Sealing Process
Introduction
With your garage floor prepped and ready, it's time to dive into the sealing process itself. In this section, we'll guide you through each step of the process, from filling cracks and repairing damage to applying the sealant like a seasoned professional. Let's get started on making your garage floor impervious to wear and tear!
Filling Cracks and Repairing Damage
Assessing and Repairing Small Cracks
Before you begin the sealing process, thoroughly inspect your garage floor for any visible cracks or small surface damages. Use a flashlight and get down at eye level to identify even the tiniest imperfections. Small cracks, if left untreated, can expand over time and undermine the effectiveness of your sealant. Once you've located the cracks, follow these steps for effective repairs:
- Clean the crack: Use a wire brush to remove loose debris and dirt from the crack. A clean surface ensures better adhesion of the patching compound.
- Apply the patching compound: Fill the crack with a high-quality concrete patching compound. Use a putty knife to push the compound deep into the crack and level it with the surrounding surface. Allow it to dry as per the manufacturer's instructions.
Dealing with Larger Gaps and Holes
For larger gaps and holes, you may need a more substantial approach to repairs. Follow these steps to effectively repair larger damages:
- Clean the area: Thoroughly clean the damaged area, removing any loose debris or crumbling concrete.
- Fill with concrete mix: Prepare a concrete mix according to the manufacturer's instructions. Fill the gap or hole with the mix, ensuring it is level with the rest of the floor surface.
- Smooth the surface: Use a trowel to smooth the surface of the repaired area, blending it seamlessly with the surrounding concrete. Allow it to cure completely before proceeding.
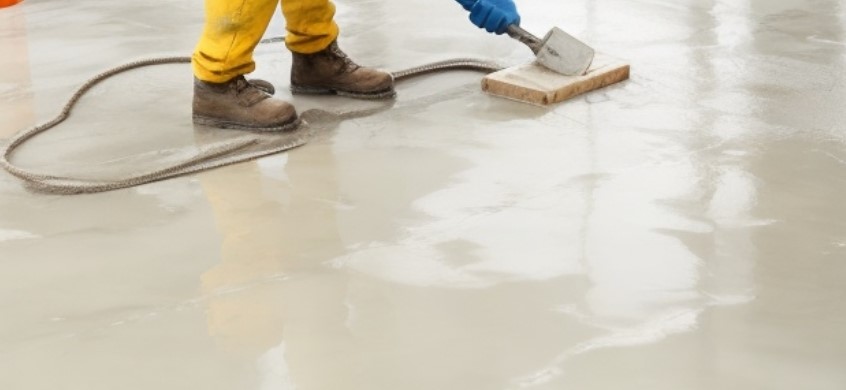
Applying the Sealant
Different Application Methods: Rolling, Brushing, Spraying
 When it comes to applying the sealant, you have several options for achieving a uniform and flawless finish. The three common application methods are rolling, brushing, and spraying. Each method has its pros and cons, and the choice largely depends on your preference and the type of sealant you're using.
- Rolling: Using a paint roller is the most popular method as it's easy and suitable for most sealants. It provides even coverage and allows you to control the amount of sealant applied.
- Brushing: A brush is ideal for reaching tight corners and edges that a roller may miss. It's also helpful for touch-ups and detail work.
- Spraying: If you have a large area to cover, using a sprayer can be more efficient. However, it requires proper technique to ensure an even coat without overspray.
Best Practices for Uniform Coverage
No matter which application method you choose, follow these best practices to achieve uniform coverage:
- Work in sections: Divide your garage floor into manageable sections to avoid missing any spots.
- Overlap each stroke: Whether you're rolling or brushing, overlap each stroke slightly to ensure consistent coverage.
- Follow the product instructions: Different sealants may have specific application guidelines, such as drying time between coats. Adhering to these instructions will optimize the sealing process.
Avoiding Common Mistakes During Application
Sealing your garage floor can be a straightforward process, but it's essential to avoid some common mistakes to achieve the best results. Here are a few pitfalls to steer clear of:
- Overapplication: Applying too much sealant can lead to an uneven and tacky surface. Stick to the recommended amount and avoid excess.
- Underapplication: On the other hand, applying too little sealant may leave gaps and weak spots. Make sure you cover the entire floor evenly.
- Rushing the process: Take your time during application to ensure thorough coverage and a professional finish. Rushing can lead to mistakes and require resealing sooner than expected.
Drying and Curing Time
Understanding the Necessary Waiting Period
Once you've completed the sealing process, you must allow adequate time for the sealant to dry and cure properly. The drying time can vary depending on the type of sealant and environmental conditions. In general, most sealants require at least 24 to 48 hours to dry before you can walk on the surface. However, it's essential to refer to the specific product instructions for accurate drying times.
Tips to Ensure Proper Curing
While waiting for the sealant to cure, there are some essential tips to follow:
- Avoid foot and vehicle traffic: Refrain from walking or driving on the freshly sealed floor until it has fully cured to prevent damage.
- Maintain adequate ventilation: Ensure proper ventilation in the garage during the drying period to help dissipate any fumes or odors from the sealant.
How to Keep the Garage Accessible During Drying
During the drying and curing time, it's crucial to find alternative parking arrangements for your vehicles and avoid storing any heavy items on the garage floor. Temporary storage solutions and creative arrangements can keep your garage functional while allowing the sealant to cure undisturbed.
To continue reading about how to extend the lifespan of your sealed garage floor and reap its long-term benefits, head over to Section 4: Maintenance and Long-Term Benefits.
Stay tuned to transform your garage into a space of ultimate protection and durability!
FAQs
Q: Can I speed up the drying time of the sealant? A: It's essential to let the sealant dry naturally, as attempting to speed up the process may lead to uneven drying and less effective sealing.
Q: Can I apply a second coat of sealant immediately after the first one? A: Applying a second coat immediately after the first may result in improper adhesion and may not yield the desired results. Always follow the product instructions for the recommended waiting time between coats.
Q: Can I drive my car into the garage after sealing? A: It's best to avoid driving your car into the garage until the sealant has fully cured. Heavy vehicles can damage the fresh sealant, compromising its effectiveness.
Maintenance and Long-Term Benefits
Introduction
Congratulations on successfully sealing your garage floor! By now, you've taken a significant step towards safeguarding your investment and ensuring a durable and visually appealing garage space. However, your efforts shouldn't end here. In this section, we will explore the importance of regular maintenance and the long-term benefits of having a sealed garage floor. Let's delve into how you can extend the lifespan of your sealed garage floor and enjoy its numerous advantages.
Extending the Lifespan of Your Garage Floor
Routine Maintenance Tips for Sealed Floors
Maintaining your sealed garage floor doesn't require a lot of effort, but it can make a world of difference in its longevity. Here are some routine maintenance tips to follow:
- Regular sweeping: Sweep your garage floor regularly to remove dirt, dust, and debris. This will prevent these particles from scratching the sealed surface.
- Mopping: Periodically mop the floor with a mild detergent or a concrete-specific cleaner. Avoid harsh chemicals that may damage the sealant.
- Avoiding heavy impact: While sealed floors are more resilient, it's still essential to avoid dropping heavy objects that could cause dents or chips.
How to Prevent Future Damages
In addition to routine maintenance, there are preventive measures you can take to protect your sealed garage floor:
- Place mats and rugs: Use mats or rugs in areas where you frequently walk or park your vehicles. This will prevent wear and tear in high-traffic spots.
- Use furniture pads: If you have workbenches or heavy equipment in your garage, place furniture pads under their legs to avoid indentations.
Saving Money on Potential Repairs
Investing in sealing your garage floor is not just about immediate protection but also about long-term cost savings. A sealed garage floor reduces the risk of extensive damages that would require costly repairs. By addressing cracks and surface issues early on, you avoid more significant repairs that may otherwise be necessary.
The Environmental Impact of Sealing
Eco-Friendly Sealant Options
If you're environmentally conscious, you'll be pleased to know that there are eco-friendly sealant options available. Look for low-VOC (volatile organic compound) sealants that have minimal impact on air quality and the environment. These sealants are less harmful during application and promote a healthier living space.
Reducing Carbon Footprint Through Sealing
Sealing your garage floor not only benefits your property but also contributes to a sustainable environment. By preventing leaks and damages, you reduce the need for repairs and replacements, which, in turn, reduces waste and consumption of additional materials. This small step in sealing your garage floor can make a positive impact on the environment.
Contributing to a Sustainable Environment
As we become more aware of our carbon footprint, making conscious choices in our home improvements can have a broader impact. Choosing eco-friendly sealants and adopting a responsible approach to maintenance aligns with sustainability efforts. By taking care of our properties with eco-conscious decisions, we contribute to a healthier planet for future generations.
FAQs
Q: How often should I sweep my sealed garage floor? A: Sweeping your sealed garage floor once a week is sufficient for routine maintenance. However, you may need to sweep more frequently if your garage receives heavy foot traffic or is frequently exposed to debris.
Q: Are there any specific cleaning products I should avoid for sealed floors? A: Avoid using acidic or harsh chemical cleaners, as they may damage the sealant and compromise its effectiveness. Stick to mild detergents or concrete-specific cleaners.
Q: Can sealing my garage floor improve the overall property value? A: Yes, a well-maintained garage with a sealed floor can enhance the overall appeal and value of your property. It adds a touch of professionalism and attention to detail that potential buyers or renters will appreciate.
**To learn how sealing your garage floor can lead to a leak-proof sanctuary, head over to Section 5: Take Action Now - Sealing with Urgency. Get inspired by real-life success stories and testimonials from individuals who have transformed their garages with our step-by-step guide. Don't miss out on the opportunity to protect your garage floor effectively and create a lasting impact on your property!
Stay tuned for the final section of this comprehensive guide, and discover the urgency of taking action to safeguard your garage floor!
Take Action Now - Sealing with Urgency
Introduction
Now that you've gained a wealth of knowledge on how to seal your garage floor like a pro, it's time to take action! Sealing your garage floor is an investment in the long-term protection and durability of your space. In this final section, we will explore the urgency of addressing this crucial task and showcase inspiring success stories and testimonials from individuals who have experienced the transformative power of a sealed garage floor. Don't wait any longer; let's dive in!
Take Action Now - Sealing with Urgency
Introduction
The time to act is now! You've learned the importance of sealing your garage floor, the necessary preparation steps, the sealing process itself, and the long-term benefits. Now, let's delve into the urgency of taking action and how sealing your garage floor can transform your space into a leak-proof sanctuary.
The Urgency of Protecting Your Garage Floor
The Risks of Procrastination
Procrastinating on sealing your garage floor can lead to significant consequences. Every day that your garage floor remains unsealed, it becomes more vulnerable to water damage, cracks, and structural issues. A small crack might seem harmless now, but left untreated, it can expand and lead to more extensive damages that are costlier to repair.
Avoiding Costly Repairs
By sealing your garage floor now, you take a proactive step towards preventing future damages. The cost of sealing your garage floor is minimal compared to the expenses of repairing structural issues or replacing the entire floor surface. Investing in sealing today can save you from financial headaches down the road.
Enjoying Long-Term Benefits
Sealing your garage floor is not just about immediate protection; it's about extending the lifespan of your garage floor and enjoying its long-term benefits. A sealed floor requires minimal maintenance, keeps your garage looking pristine, and adds value to your property. With proper care, your sealed garage floor can withstand years of wear and tear.
Conclusion
Sealing your garage floor is a crucial investment in the longevity and protection of your space. By following our ultimate step-by-step guide, you can ensure a seamless and successful sealing process. From understanding the need for sealing to exploring eco-friendly options, you've learned the essential aspects of sealing your garage floor like a pro.
Don't delay any longer! Take action now and seal your garage floor to create a leak-proof sanctuary that stands the test of time. With regular maintenance and a responsible approach to caring for your sealed floor, you can enjoy its numerous benefits for years to come.
By following this comprehensive guide, you're well-equipped to make your garage floor invulnerable to damage. Sealing your garage floor is not just a task; it's an investment that yields long-term rewards.
Search
Categories
Recent Posts
Get The Best Floor Protection